Appearance
A Revision Cycle
Rev A comes back with comments; Rev B goes out. This page covers the loop — reading a drawing's revision history, comparing two revisions to see exactly what moved, and advancing the project through its stage gate when the cycle is done.
How the pieces fit
Two timescales run at once, and it helps to keep them apart:
- A revision cycle is a loop within a stage: issue → review → resolve → re-issue. It can run as many times as the comments need.
- A stage is the milestone the cycles are working towards — Preliminary Design, Outline Design, Detailed Design, Construction, As-Built. You advance the whole project to the next stage once the stage's checks pass.
The model is never frozen. Freezing captures snapshots of its drawings; the model keeps evolving into the next revision and the next stage underneath them.
Part 1 — Read the revision history
In the P&ID model editor
- Open the model and select a drawing from the view tabs in the footer.
- View → Revision History in the menu bar. The panel header reads Revision History.
It lists the drawing's revisions. Per revision you can:
| Control | What it does |
|---|---|
| View snapshot | Opens the frozen snapshot of that revision |
| Download export | Downloads that revision's export |
| Export register | Downloads the whole revision register for the drawing |
| Compare revisions | Switches the panel into compare mode (see Part 2) |
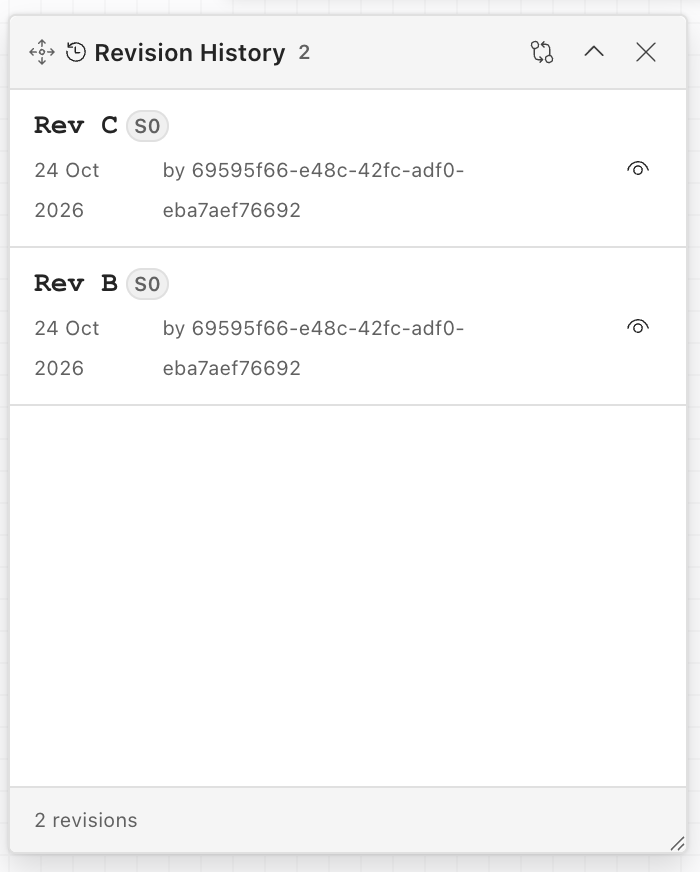
If the panel says "No drawing view selected", pick a drawing from the footer tabs first — the Model tab is not a drawing.
On the Draw page
File → Version history… opens the Version history dialog and lists the drawing's saved versions. Three things to do there:
- Save named version — pin the current state as a named milestone rather than leaving it among the autosaves. Do this before you issue.
- Restore a version — replaces the drawing's content, for every collaborator, and takes a backup version first. The confirm dialog says so; read it. A version saved while the drawing was still empty is a valid state too: restoring it clears the drawing, and it stays clear after a reload.
- Export register — downloads the full audit trail as CSV: one row per revision with its id, name, type (Auto for an autosave, Named for a milestone you named), author, UTC timestamp and comment, newest first. It is the file to attach when somebody asks what changed and when, and a drawing with no revisions yet gives you a header-only file rather than an error.
Part 2 — Compare two revisions
- In the Revision History panel, turn on compare mode (Compare revisions in the header).
- Select the two revisions you want to compare.
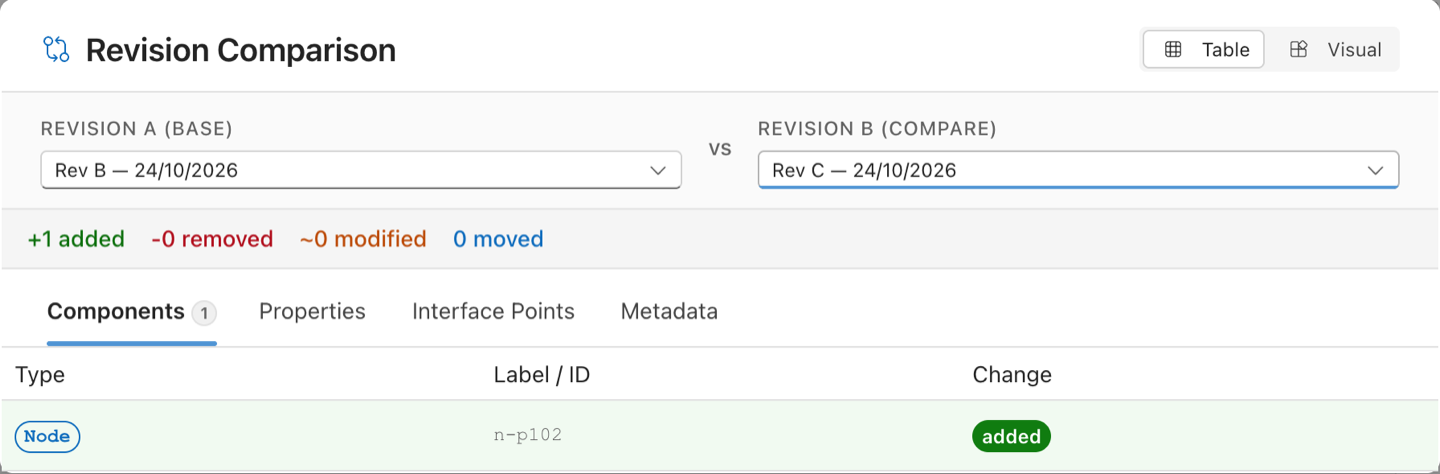
The revision comparison dialog opens. At the top is a one-line summary — +n added, −n removed, ~n modified — and below it four tabs:
| Tab | What it lists |
|---|---|
| Components | Type, Label / ID and Change per component. Added rows are tinted green, removed rows red. A control on each row highlights that component on the canvas. |
| Properties | Component ID, Property, Old Value, New Value — every property that changed, by component. |
| Interface Points | Interface ID, Change, Node, Label, Connected View — changes to the boundaries where this drawing meets its neighbours. |
| Metadata | Two side-by-side cards, Revision A and Revision B, with every metadata field; changed fields are highlighted on both sides. |
Each tab badges its own change count, so you can see at a glance where a revision's work actually landed.
The Draw page has its own version comparison through File → Version history… The four-tab component/property/interface diff described above is the P&ID model editor's.
Part 3 — Run the cycle
A cycle, in the order it actually happens:
- Issue Rev A. Freeze the drawings and send the transmittal — Issuing a Drawing.
- Collect comments. Either in the app, or as a marked-up PDF you import back as comments — Running a Design Review.
- Resolve them. Make the change in the model, then move the comment to Resolved. The BoM re-syncs on save, so quantities follow the change without being asked.
- Verify and close. A checker Verifies each resolution; an approver Closes it. The lifecycle and who may do what are in Running a Design Review.
- Compare before you re-issue. Run Part 2 against the revision you issued. The diff is your check that the drawing changed where the comments said and nowhere else.
- Issue Rev B. Freeze again — each freeze is a new snapshot, and the register's Last Frozen and Rev columns move on.
Repeat until the approver has nothing left to return. Then advance the stage.
The project stage gate
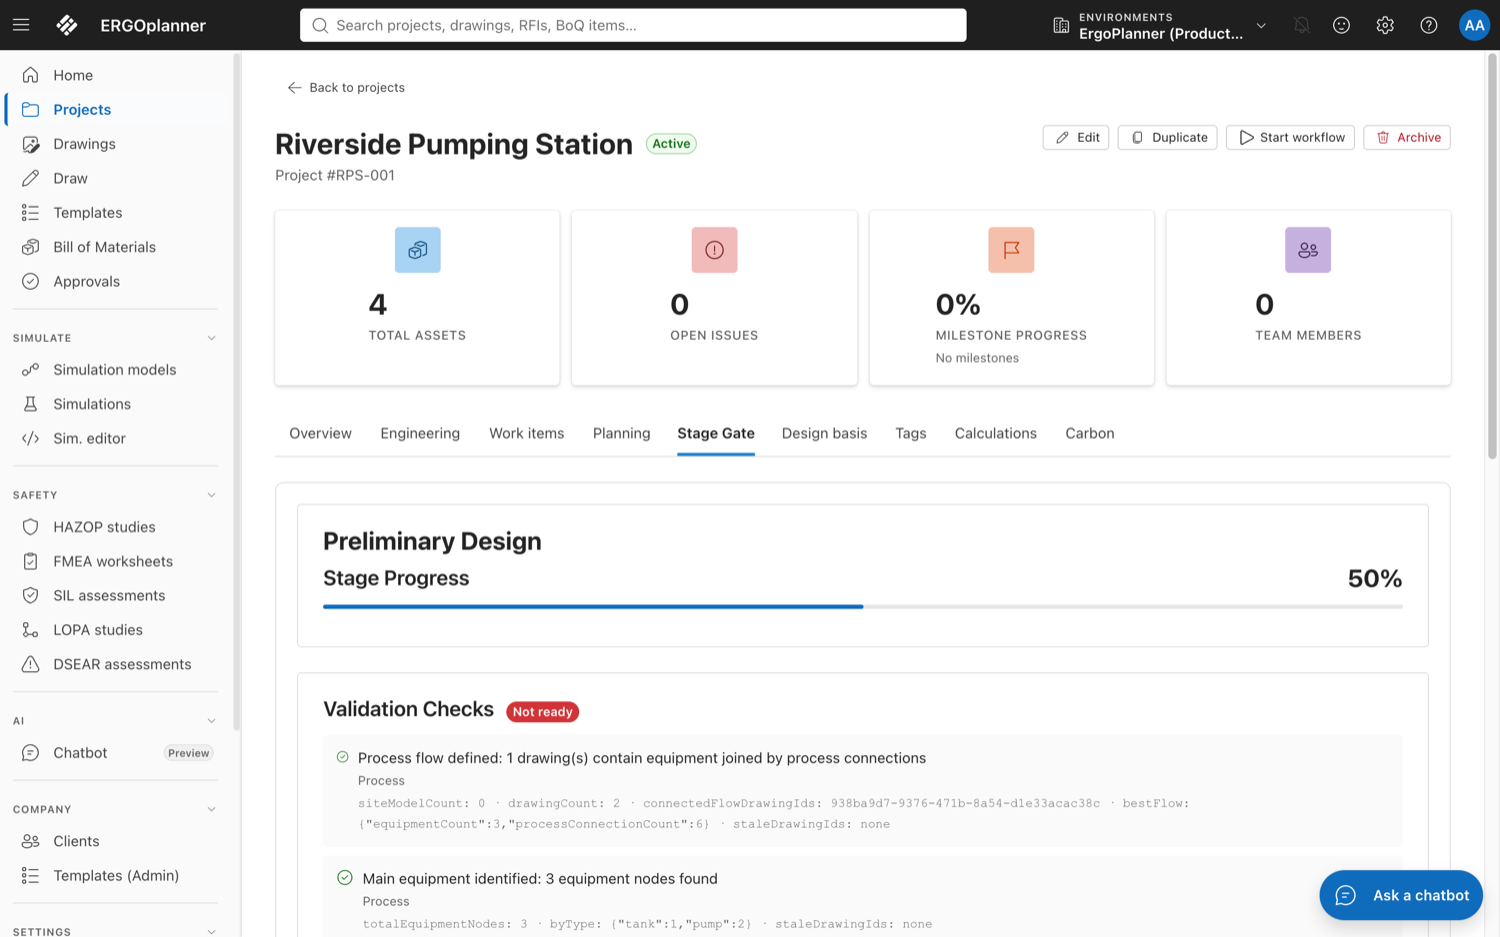
The stage gate lives on the project, not on a drawing: Projects → your project → Stage Gate.
The five stages
| Stage | Shown as |
|---|---|
| Stage 0 | Preliminary Design |
| Stage 1 | Outline Design |
| Stage 2 | Detailed Design |
| Stage 3 | Construction |
| Stage 4 | As-Built |
As-Built is terminal — there is no forward transition out of it, and the panel badges it Terminal.
Reading the panel
- Stage Progress — a percentage and a progress bar for the current stage.
- Validation Checks — one card per check, each with its name and category. When a next stage exists, the section header carries a verdict badge: Ready for next stage or Not ready.
- Freeze Stage / Unfreeze — freezing the stage locks it. While frozen the panel says "Project is frozen at stage. Unfreeze to advance" and the advance button is disabled; unfreezing asks for a reason.
- A history grid at the foot of the panel records every transition, and reads "No transitions yet" on a new project.
Each stage has its own set of checks — the project's own metadata and site/flow basis early on, then drawings and templates and a preliminary BoM, then detailed specifications and calculations, then whether every drawing is approved and every comment resolved, and finally the as-built and handover checks. The cards name the ones that apply to you; read them there rather than from a list in a document, because they are what the server will actually assert.
The design basis (the Stage 0 and Stage 1 values)
Four checks read design values you type in, not anything drawn: the design flows and the influent characteristics (Stage 0), and the electrical load estimate and the civil works outline (Stage 1). Enter them on Projects → your project → Design basis. When one of these checks fails, its card says "… in Project → Design basis".
| Field | Unit | What the gate needs |
|---|---|---|
| ADWF, DWF, PWF (average dry, dry and peak wet weather flow) | m³/d | All three, each above zero. |
| Influent BOD, COD, TSS, TN, TP | mg/L | At least three of the five, each above zero. |
| Estimated electrical load | kW | Above zero. |
| Civil works outline | free text, up to 4000 characters | Not empty. |
- Numbers must be zero or more. A zero saves, but the gate does not count it, and the form warns you about it.
- Flows out of the usual order PWF ≥ ADWF ≥ DWF save too, with a warning above the form. Check the figures; the warning does not block the save or the gate.
- Clearing a field and clicking Save removes that value.
- Saving needs the right to edit the project (Owner, Admin or Project Manager). Everyone who can open the project can read the values.
What the drawing and document checks look at
Some checks read your work rather than typed values:
- Process flow defined (Stage 0) passes when the project has a site model with a drawing, or any live project drawing holds at least two equipment symbols joined by process connections, directly or through in-line symbols such as valves (a pump, valve, tank run counts). Instrument, signal, utility, electrical, mechanical and future-provision lines do not join equipment; a connection with no line type counts as a process line. Deleted drawings are ignored, and drawings whose saved content is out of date are reported rather than counted.
- Main equipment identified (Stage 0) counts the equipment symbols on editor drawings (pumps, tanks, mixers and so on), however the symbol was stored.
- Preliminary BoQ (Stage 1) counts the lines of every Bill of Materials on one of the project's live drawings, plus any project-level BoQ. The message tells "no BoM on any drawing" apart from "a BoM exists but is empty". A deleted drawing's BoM does not count.
Filing documents as gate evidence
Four later checks need a document of the project, not a typed value: Foundation design and Single-line diagrams (Stage 2), and Quality assurance plan and O&M manuals (Stage 3). File one from Documents: open a document's row actions (⋯) and choose Use as gate evidence, then Foundation design, SLD, QA plan or O&M manual (a checkbox submenu; the kinds the document already carries are ticked). With one project filtered, evidence documents show a Gate evidence: … badge. The check passes only when the filed document exists and belongs to this project; its message says where to file it otherwise. Filing needs permission to upload documents; reading needs project read access. The control philosophy is filed from the drawing instead (Control Philosophy).
Advancing
- Click Advance to next stage.
- The Advance Stage dialog opens. "Select the target stage and provide a reason. For Stage 4 an approver is required."
- Fill it in:
| Field | Notes |
|---|---|
| Decision | The target stage. |
| Reason | Required. |
| Override Warnings | "Acknowledge and proceed despite validation warnings." Tick it only when you mean it — it is recorded. |
| Approver | Required for Stage 4 As-Built. The dialog says so and will not submit without one. |
If the transition is refused, an error banner explains why and can be dismissed once you have read it.
A gate that passes is not the same as a gate that is satisfied. Warnings can be overridden and the override is recorded against the transition. If you override, say why in the Reason field — that text is the only explanation anybody reading the history later will have.
Things worth knowing
- Each BoM export belongs to the revision it came from. Export the CSV at the point you freeze, not weeks later — the BoM tracks the live model, so a later export will not match the drawing you issued. See Bill of Materials.
- Comments survive a re-issue. Review comments hang off the revision they were raised against, so Rev A's comment history stays readable after Rev B goes out.
- Compare, then issue — not the other way round. The diff is cheap; a wrongly issued revision is not.
- Advancing a stage does not freeze the model. It moves the project's milestone. Drawing snapshots are what freeze.
- There is no branching. You cannot develop two alternatives in parallel on the same model and merge one in. To explore an alternative, duplicate the project or the model.
See also
- Issuing a Drawing — freeze, register, transmittal
- Running a Design Review — the comment lifecycle and the roles
- Starting a Workflow — putting a re-approval in somebody's queue
- Bill of Materials — regenerating and exporting per revision