Appearance
Drawing Templates Overview
Parametric, code-described P&ID building blocks — "describe the drawing once, reuse it everywhere"
Shipped-library note: The template library currently ships twelve Level-1 templates, all exported from the Level-1 library and seeded as system templates: six ordinary ones (
intermediate-pumping-station,sewage-pumping-station,primary-settlement-tank,activated-sludge-lane,final-settlement-tank,chemical-dosing-skid) and six engineered ones (ww-pumping-station,flow-balancing-tank,aeration-blower-set,fft-flow-control,storm-tank,chemical-dosing). Eleven are published; the engineeredchemical-dosingis still a draft and visible to administrators only. The worked example here is the Sewage Pumping Station (with Overflow Storage) (sewage-pumping-station), documented under Pumping Stations. Other arrangements referenced on these pages (separate pump / manifold / instrument-cluster blocks) are illustrative authoring patterns, not separately shipped templates.
Introduction
ErgoPlanner Drawing Templates let you capture a complete, pre-solved P&ID arrangement — its symbols, connections, instrumentation, sizing rules and engineering intent — as parametric template code. Instead of redrawing a pumping station or an instrument loop on every project, you author it once as a template, then drop it onto a drawing and configure it with a few parameters (duty count, pipe size, standard).
Not the same as simulation templates. This page covers the drawing/P&ID template system (the MBEP four-level platform). For pre-built process simulation plant configurations (MLE, A2O, Bardenpho…), see Templates Overview.
Engineered templates go further. A handful of Level-1 templates carry an
engineeringblock as well as geometry: a plant model, generated control graphs, an I/O schedule, an alarm schedule, a calculation sheet, a control philosophy and published port values — plus a workspace where the placed unit can be run as a client-side, PLC-style scan simulation. They are asked for their key parameters on drop, and they open a workspace on double-click. See Engineered Templates. Everything on this page applies to them too; the engineering block is additional.
A template is "template code that describes the drawing in detail": a small, declarative program that places objects, routes pipes, adds instruments, and exposes typed parameters and connection points.
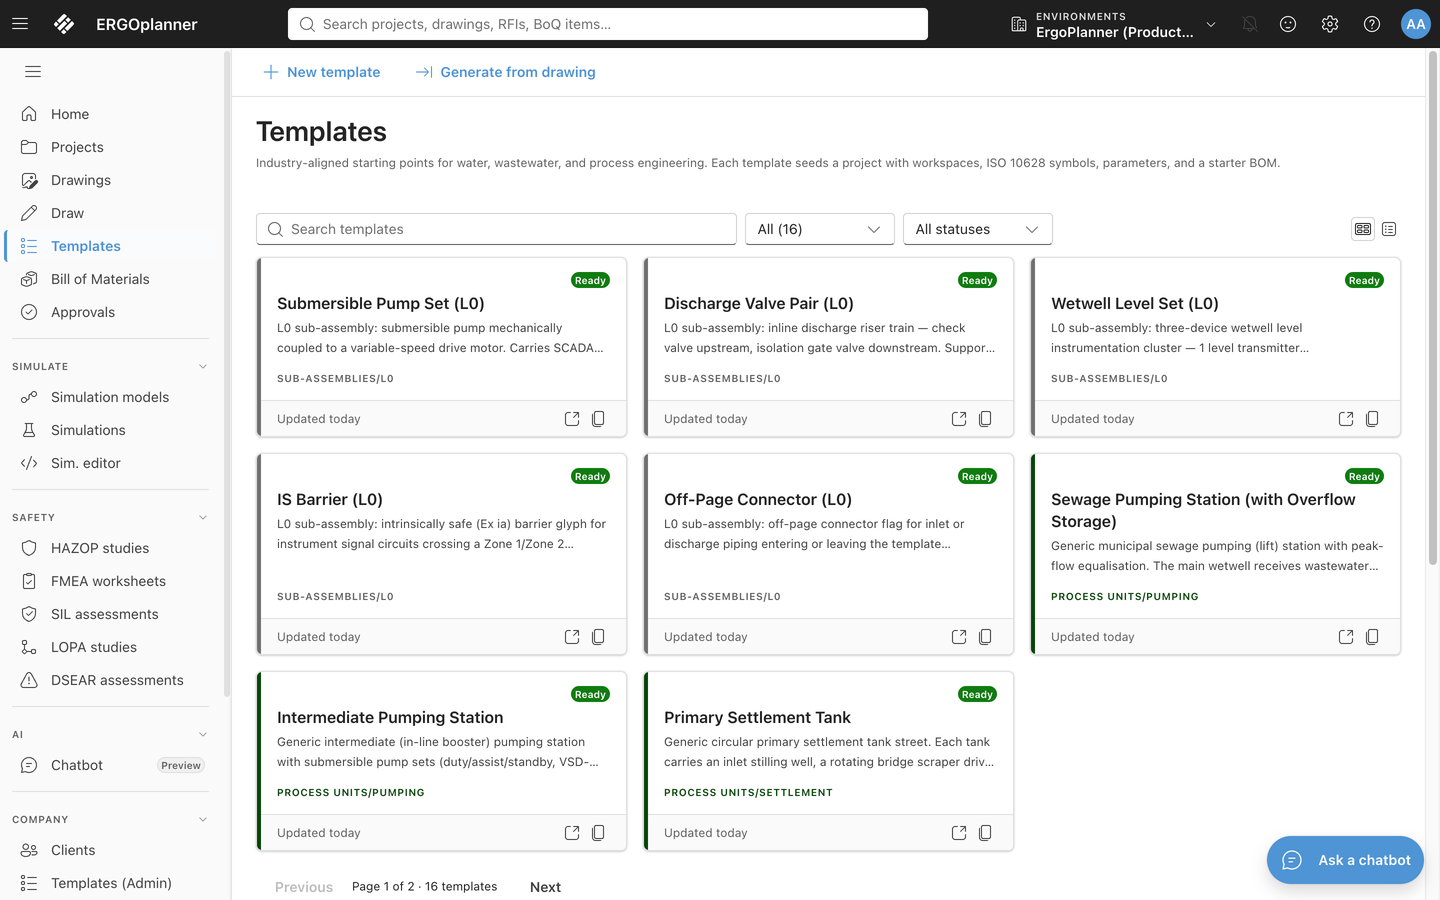
The Templates page in the sidebar is the library itself: each card names a template, describes it, tags it with the family it belongs to (for example SUB-ASSEMBLIES/L0 or PROCESS UNITS/PUMPING), and shows whether it is Ready.
The four levels
Templates compose from small to large:
| Level | Name | What it is | Example |
|---|---|---|---|
| 0 | Dynamic Component | A single intelligent stencil/arrangement | Submersible Pump Arrangement, Level Instrument Cluster |
| 1 | Drawing Template | A pre-solved micro-P&ID composed from Level-0 blocks | Inlet Pumping Station, Chemical Dosing Skid |
| 2 | Model / Site Model | A complete process area composed from templates | A full inlet works |
| 3 | View / Revision | A sheet extracted from a model | An issued P&ID drawing |
A Level-1 template can nest Level-0 (and other Level-1) templates through typed interface points — see the pumping-station example, where one Level-1 template composes pumps, a manifold, a flowmeter and a level cluster.
How a template is described in code
Every template is a default-exported Template.define(slug, {...}) object. The shape is the same for every template in the library:
typescript
import { Template, param } from '@ergoplanner/template-sdk';

// 10 discipline AI prompts live alongside the template (process, mechanical,
// electrical, civil, BIM, layout, calc-graph, process-description + DSEAR + HAZOP).
export const prompts = {
  layout: 'Pumps in a row; rising mains rise to a common discharge header…',
  processDescription: 'Inlet pumping station lifting screened flow to the works.',
  // …the remaining discipline prompts
};

export default Template.define('my-template', {
  name: 'My Template',
  level: 1,
  category: 'Process Units/pumping',
  standard: 'BS 1553 / BS 1646',

  // Typed parameters — the knobs the engineer turns when placing the template.
  params: {
    pump_count:     param.integer(3, { min: 2, max: 6 }),
    design_flow:    param.number(100, { min: 10, max: 2000, unit: 'm³/h' }),
    discharge_size: param.dimension('DN150', { min: 'DN80', max: 'DN600' }),
    include_storm:  param.boolean(true),
    level_type:     param.enum('ultrasonic', ['ultrasonic', 'radar'] as const),
  },

  // Typed connection boundaries other templates wire into. Positions are grid units (1 GU = 8 mm).
  interfaces: (p) => ({
    inlet:  { position: [0, 20],  direction: 'south', size: 'DN300',          type: 'pipe' },
    outlet: { position: [55, 10], direction: 'east',  size: p.discharge_size, type: 'pipe' },
  }),

  // build(p, ctx) places symbols and routes pipes from the parameter values.
  build: (p, ctx) => {
    ctx.repeat(p.pump_count, (i) => {
      ctx.place('pump-submersible', { at: [4 + i * 6, 0], tag: `${p.tag_prefix}P${i + 1}` });
    });
    ctx.when(p.include_storm, () => {
      ctx.place('valve-gate-standard', { at: [50, 30] });
    });
  },
});
The ctx build verbs
| Verb | Purpose |
|---|---|
ctx.place(symbolId, { at, on?, tag?, rotation?, props?, signalTo? }) | Place a symbol; returns a PlacedSymbol |
ctx.pipe(id, { size?, material? }) + ctx.route(pipe, waypoints) | Declare and lay out a pipe run |
ctx.branch(pipe, { at, direction, components?, terminator? }) | Tee a branch off a pipe (drain / sample / bypass) |
ctx.connect(from, to) | Connect two interface refs with an auto-routed pipe |
ctx.compose(templateId, params, { at }) | Nest another template via its interface points |
ctx.repeat(count, (i) => …) | Parametric repetition (e.g. N pumps) |
ctx.when(condition, () => …) | Conditional content (e.g. optional storm overflow) |
Equipment tags use
tag:inplace(); free-floating text usesctx.label(text, { at }). See the full Template Language Reference for every signature.
The param.* helpers
param.number(default, {min,max,unit}), param.integer(default, {min,max}), param.boolean(default), param.enum(default, [values] as const), param.string(default), param.dimension('DN150', {min,max}), param.symbol(default, {category}). Full details in the reference.
Copy-and-configure (not AI re-drawing)
When you place a template into a model it is deep-copied with full fidelity — every symbol position, connection, property and prompt is preserved exactly — then parameters adjust the duty count / sizes / options. This guarantees the human-validated layout is reproduced precisely, rather than re-generated unpredictably.
Authoring in Template Studio
- Templates → Template Studio → New Template
- Write the template in the Monaco code editor; the live preview renders as you type
- Use the Parameter Tester to change values (e.g.
pump_count = 2→6) and watch the layout expand - Fill the 10 discipline prompts in the prompt editor panel (incl. DSEAR / HAZOP)
- Run the Quality Gate — structural checks + the AI reconstruction test (a score ≥ 85 promotes the template to
published) - Save → a version is recorded; Publish to the DB-fed gallery
Template maturity: Draft to Published
A template's maturity level (Draft, Review, Approved, Published) is not edited in a form. The New Template dialog (Admin → Drawing templates → Process Templates) has no Maturity picker: every new template starts as Draft. Open a template with Edit to see its current level as a read-only badge, with the last reconstruction score and date when one exists. Two buttons move it forward:
- Run reconstruction test regenerates the template from its prompts with your organisation's AI provider, scores the result and stores the score. It needs at least 3 of the 10 prompts filled (otherwise it explains this), and shows an error if the AI provider is unavailable or times out.
- Promote to Review / Approved / Published moves the template one level up. Review needs the template to validate. Approved also needs a reconstruction score of 85 or more from the last 30 days; Published needs 85 or more from the last 90 days. When a gate is not met, the reason is shown in the dialog and the level does not change.
Saving the form changes the name, description, version, category, tags and standards only; it never changes the level.
Import as template (from a CAD drawing or a PDF)
An existing drawing can become a template in one action. Use Tools → Import as template… in Draw, or the Import as template button on the last step of the Import CAD Drawing dialog after any import (DXF, DWG or a vector PDF from CAD). The chain runs in this order:
- Import: the file is imported as usual and keeps its sheet background (frame, title block, text and notes) on the locked CAD background layer. See Importing a CAD Drawing.
- Resolve CAD blocks: when the import left placeholders (unmapped blocks, or the tag suggestions from a PDF), the panel opens. Map them, then click Apply. Apply, or closing the panel, hands back to the chain.
- Check: every placeholder the import left must be resolved, either to a symbol or with Ignore. If any is still a placeholder, the save is blocked with "N CAD placeholders are still unresolved…". The message's Resolve CAD blocks… button reopens the panel, and Cancel ends the chain. A placeholder is not a library symbol, so it cannot go into a template.
- Capture: everything the import placed is captured, which is every symbol it added to the drawing (resolved placeholders included). Symbols that were on the drawing before the import are left out. The sheet background the import added goes in too.
- Save: the Create Template from Selection wizard opens with the Template Name prefilled from the drawing's title block (its title, else its drawing number). Save stores it in your library as a personal draft, like any captured template, and it appears in the Templates panel straight away.
In the template, the sheet background is decoration, not equipment. Placing the template draws the frame, title block and text as locked drawn shapes on the CAD background layer, never as symbols, so they are not in the Bill of Materials or the tag register. A template carries at most 5,000 background items.
Learn the language
- Template Language Reference — the complete syntax: every
param.*constructor and everyctx.*build verb, with exact signatures, return types, and examples.
Worked use cases
- Pumping Stations — submersible pump arrangement (Level 0), valve-chamber manifold (Level 0), and a full inlet pumping station (Level 1) with duty/standby variations, storm overflow, and flow metering.
- Instrumentation Arrangements — level instrument clusters (ultrasonic / radar / float backup) and inline flowmeter compounds (electromagnetic / ultrasonic / vortex) with isolation, bypass and drains.
Related topics
- Template Language Reference
- Pumping Stations use case
- Instrumentation Arrangements use case
- Building Process Diagrams
- Developer spec:
docs/06-specifications/mbep/03-level-1-templates.mdand the tutorial
References
- BS 1553 — Graphical symbols for general engineering (pipework/instruments)
- BS 1646 — Symbolic representation for process measurement control functions
- ISO 10628 — Diagrams for the chemical and petrochemical industry