Appearance
Account Setup and Preferences
Configure your ErgoPlanner account settings, preferences, and water company information for personalized simulation and reporting.
Overview
Learn how to:
- Create and configure user accounts
- Set up company and water utility information
- Configure default preferences and units
- Manage regional regulatory settings
- Customize interface and display options
Estimated Time: 10 minutes
Difficulty: Beginner
Prerequisites
- Access to ErgoPlanner deployment
- Web browser (see Installation)
- Email address for account creation (optional)
Step 1: Account Creation
1.1 Create a New Account
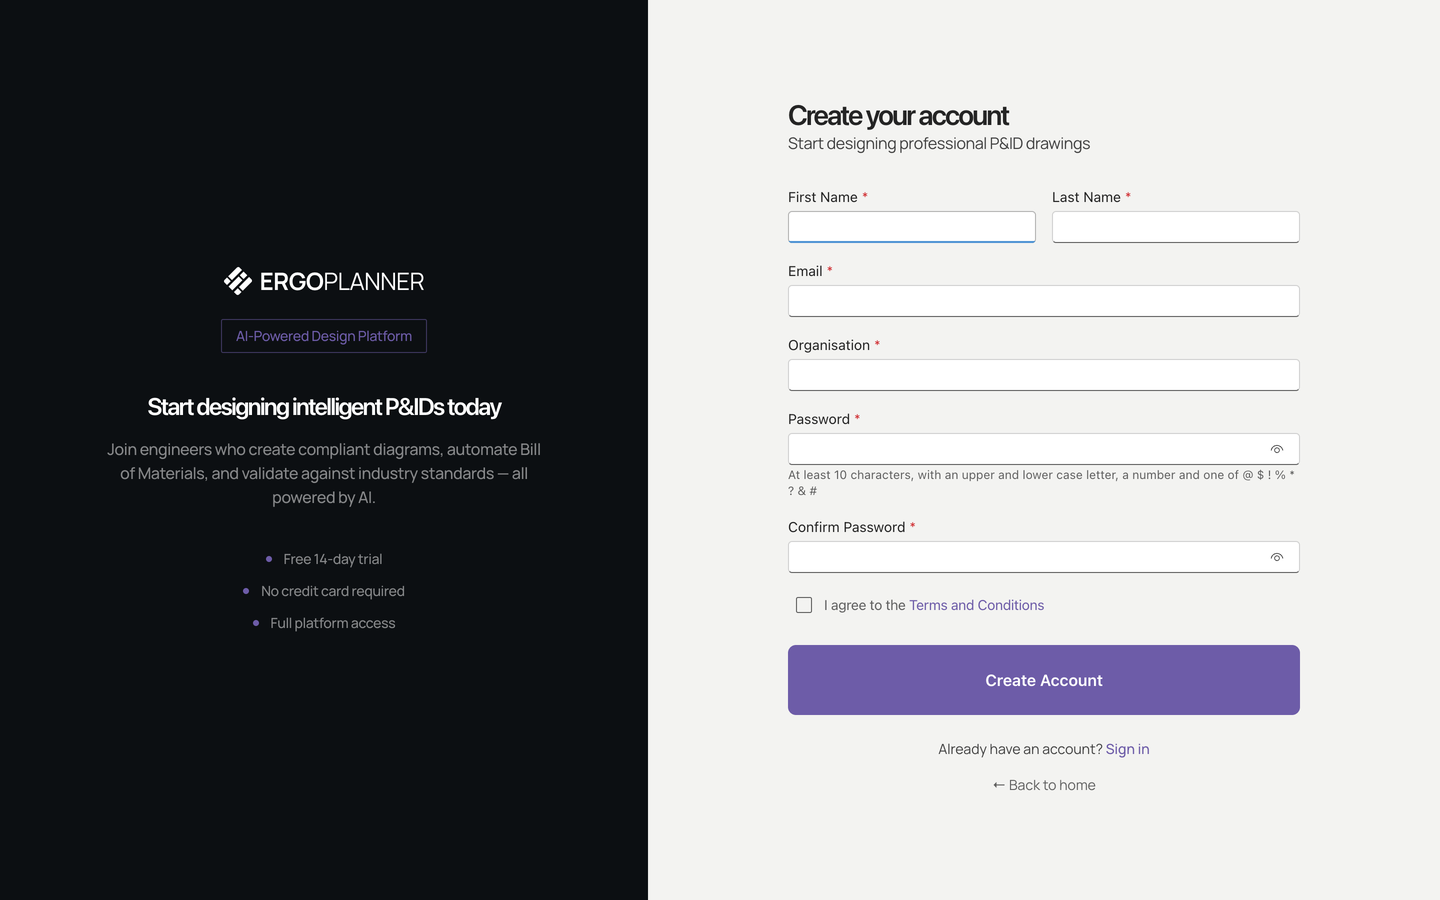
- Navigate to the ErgoPlanner login page
- Click "Create account" at the foot of the sign-in form
- Fill in the registration form — every field is required:
| Field | Example |
|---|---|
| First Name | John |
| Last Name | Smith |
| john.smith@example.com | |
| Organisation | Example Water Services |
| Password | At least 10 characters, with an upper and a lower case letter, a number, and one of @ $ ! % * ? & # |
| Confirm Password | (the same password again) |
- Tick "I agree to the Terms and Conditions"
- Click "Create Account"
- Check your email for verification link (if email verification is enabled)
Tip: Using your work email helps with collaboration and project sharing.
While the sign-up trial is active the account has Professional-plan features. The Billing page shows a Trial banner with the days left and the trial end date; once the trial ends, your plan's own features apply.
1.2 Email Verification
If email verification is required:
- Open the verification email from ErgoPlanner
- Click the "Verify Email" link
- You'll be redirected to ErgoPlanner and logged in automatically
Note: Some deployments may not require email verification. Check with your system administrator.
1.3 First-Time Login
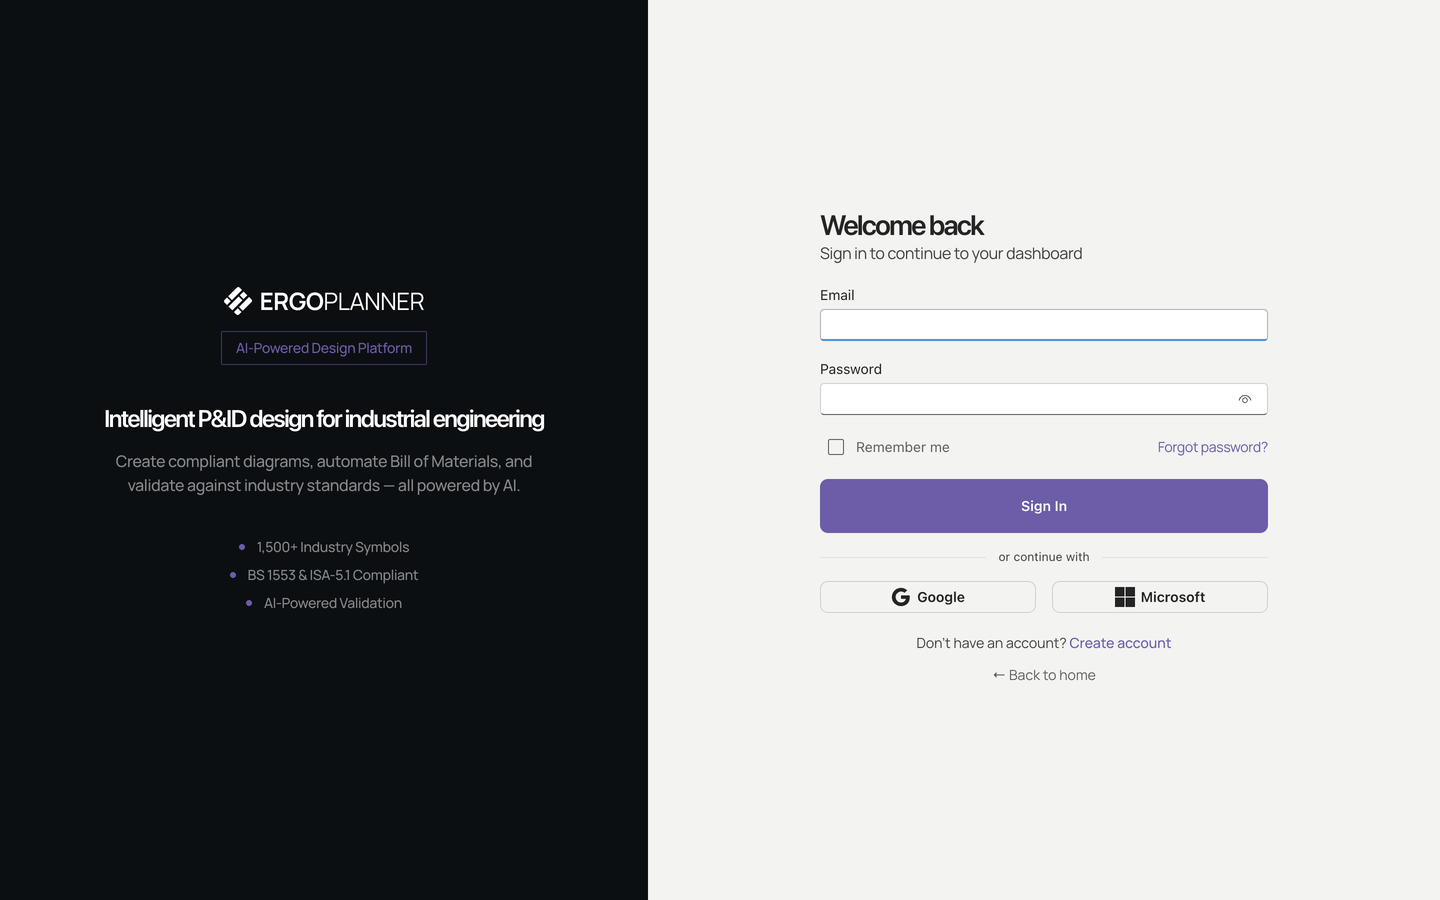
After account creation or verification:
- Enter your email and password
- Click "Sign In"
- You'll be taken to a welcome screen with quick-start options
- Click "Set Up Preferences" to configure your account
Step 2: Water Company Information
Configure your water utility or organization information for reports and documentation.
2.1 Access Company Settings
- Click your profile icon in the top-right corner
- Select "Settings" from the dropdown
- Navigate to the "Company Information" tab
Screenshot placeholder: Settings page with Company Information tab selected, showing form fields.
2.2 Basic Company Details
Fill in your organization information:
| Field | Description | Example |
|---|---|---|
| Company Name | Official organization name | Springfield Water Utility |
| Short Name | Abbreviation or short form | SWU |
| Department | Your specific department | Wastewater Treatment |
| Address | Physical address | 123 Water Street |
| City | City name | Springfield |
| State/Province | State or province | IL |
| Postal Code | ZIP or postal code | 62701 |
| Country | Country name | United States |
Tip: This information appears on exported reports and PDF documents.
2.3 Contact Information
Add organizational contact details:
| Field | Purpose | Example |
|---|---|---|
| Main Phone | Primary contact number | +1 (217) 555-0100 |
| General contact email | info@springfieldwater.gov | |
| Website | Company website | www.springfieldwater.gov |
| Logo Upload | Company logo for reports | (Upload PNG/JPG, max 2MB) |
2.4 Upload Company Logo
- Click "Upload Logo" button
- Select your logo file (PNG or JPG, recommended 300x100px)
- Preview the logo in the settings panel
- Click "Save"
The logo will appear on:
- PDF reports header
- Exported documentation
- Project cover pages
Warning: Logo files larger than 2MB will be rejected. Resize before uploading.
Screenshot placeholder: Company information form filled with example data above, logo preview showing company logo.
Step 3: Regional Settings
Configure regional settings for units, regulations, and standards.
3.1 Access Regional Settings
In Settings, navigate to the "Regional" tab.
3.2 Unit System Selection
Choose your preferred unit system:
Option 1: Metric (SI)
- Flow: m³/day, L/s
- Concentration: mg/L, g/m³
- Temperature: °C
- Volume: m³, L
- Area: m², ha
Option 2: US Customary
- Flow: MGD, gpm
- Concentration: mg/L, lb/ft³
- Temperature: °F
- Volume: gal, MG
- Area: ft², acre
Option 3: Mixed/Custom
- Select units individually for each parameter type
Tip: Most of the world uses Metric. The US typically uses US Customary with some metric (mg/L for concentration).
Screenshot placeholder: Regional settings showing unit system radio buttons with "Metric (SI)" selected.
3.3 Regional Regulatory Standards
Select your regulatory framework:
| Region | Standard | Effluent Limits Source |
|---|---|---|
| United States | EPA | 40 CFR Part 133 |
| European Union | EU UWWTD | 91/271/EEC |
| United Kingdom | UK | Urban Wastewater Treatment Regulations |
| Canada | Federal | CEPA, provincial regulations |
| Australia | NHMRC | ADWG, state EPA |
| Custom | User-defined | Manual entry |
Selecting a standard pre-populates typical effluent limits:
EPA (US) Typical Limits:
- BOD₅: 30 mg/L (monthly avg), 45 mg/L (weekly avg)
- TSS: 30 mg/L (monthly avg), 45 mg/L (weekly avg)
- pH: 6.0-9.0
EU UWWTD Limits:
- BOD₅: 25 mg/L
- COD: 125 mg/L
- TSS: 35 mg/L
- TN: 10-15 mg/L (depending on size)
- TP: 1-2 mg/L (depending on size)
Note: You can customize these limits after selection.
3.4 Custom Effluent Limits
To set custom discharge limits:
- Select "Custom" regulatory standard
- Click "Edit Limits"
- Enter your specific permit limits:
| Parameter | Monthly Avg | Weekly Avg | Daily Max |
|---|---|---|---|
| BOD₅ | 10 mg/L | 15 mg/L | 20 mg/L |
| TSS | 10 mg/L | 15 mg/L | 20 mg/L |
| NH₄-N | 2 mg/L | 4 mg/L | 6 mg/L |
| TN | 8 mg/L | 12 mg/L | 15 mg/L |
| TP | 0.5 mg/L | 1.0 mg/L | 1.5 mg/L |
- Click "Save Limits"
These limits will be used for compliance checking in simulation results.
Screenshot placeholder: Custom effluent limits table showing editable fields for each parameter and averaging period.
3.5 Language and Locale
Configure display language and number formatting:
| Setting | Options | Example |
|---|---|---|
| Language | English, Spanish, French, German, etc. | English (US) |
| Date Format | MM/DD/YYYY, DD/MM/YYYY, YYYY-MM-DD | MM/DD/YYYY |
| Number Format | 1,234.56 or 1.234,56 | 1,234.56 |
| Currency | USD, EUR, GBP, CAD, etc. | USD ($) |
Note: Language translations may be limited in some versions. Check documentation for availability.
Step 4: Default Preferences
Set default values for new projects and simulations.
4.1 Access Default Preferences
In Settings, navigate to the "Defaults" tab.
4.2 Simulation Defaults
Configure default simulation settings:
| Setting | Default Value | Options |
|---|---|---|
| Simulation Type | Steady-State | Steady-State, Dynamic |
| Solver Method | Newton-Raphson | Newton-Raphson, Successive Substitution |
| Tolerance | 0.001 | 0.0001 - 0.01 |
| Max Iterations | 500 | 100 - 2000 |
| Temperature | 20°C | 5-40°C |
| Biokinetic Model | ASM1 | ASM1, ASM2d, ASM3 |
Tip: These defaults apply to all new projects. You can override them per-project.
Screenshot placeholder: Defaults tab showing simulation settings table with dropdown menus for each option.
4.3 Process Unit Defaults
Set default parameters for commonly used process units:
Aeration Tank Defaults:
- Volume: 2,000 m³
- DO Setpoint: 2.0 mg/L
- Alpha: 0.7
- Beta: 0.95
Clarifier Defaults:
- Depth: 4 m
- Settling Model: Takács
- Peak Factor: 2.5
Pump Defaults:
- Efficiency: 75%
- Speed: 1,750 RPM
These values populate automatically when adding new units to diagrams.
4.4 Display Preferences
Customize interface display options:
| Preference | Options | Recommended |
|---|---|---|
| Theme | Light, Dark, Auto | Auto (matches system) |
| Canvas Grid | Show, Hide | Show |
| Grid Size | 10-50 px | 20 px |
| Snap to Grid | On, Off | On |
| Show Tooltips | Always, On Hover, Never | On Hover |
| Auto-save Interval | 1-30 min | 5 min |
| Decimal Places | 0-6 | 2 |
Tip: Enable "Snap to Grid" for cleaner, more professional-looking diagrams.
Screenshot placeholder: Display preferences showing theme selector (Light/Dark/Auto) and grid options with checkboxes.
4.5 Notification Preferences
Configure when you receive notifications:
| Event | In-App | Push | |
|---|---|---|---|
| Simulation Complete | ☑ | ☑ | ☐ |
| Simulation Failed | ☑ | ☑ | ☐ |
| Project Shared | ☑ | ☑ | ☐ |
| Collaboration Invite | ☑ | ☑ | ☐ |
| System Maintenance | ☑ | ☑ | ☑ |
| New Features | ☐ | ☑ | ☐ |
Note: Push notifications require browser permission and may not work in all browsers.
Step 5: Carbon Footprint Settings
Configure defaults for carbon footprint calculations.
5.1 Access Carbon Settings
In Settings, navigate to the "Carbon Footprint" tab.
5.2 Regional Grid Emission Factors
Set your electricity grid emission factor:
| Region | Factor | Unit |
|---|---|---|
| US Northeast | 0.249 | kg CO₂e/kWh |
| US Midwest | 0.618 | kg CO₂e/kWh |
| US South | 0.430 | kg CO₂e/kWh |
| US West | 0.313 | kg CO₂e/kWh |
| EU Average | 0.255 | kg CO₂e/kWh |
| UK | 0.233 | kg CO₂e/kWh |
| Custom | (enter value) | kg CO₂e/kWh |
Tip: Contact your utility for the most accurate emission factor for your location.
Screenshot placeholder: Carbon settings showing regional grid dropdown with emission factor auto-populated.
5.3 Fuel and Chemical Emission Factors
Configure emission factors for common consumables:
| Item | Default Factor | Unit |
|---|---|---|
| Natural Gas | 0.185 | kg CO₂e/kWh |
| Diesel | 2.68 | kg CO₂e/L |
| Methanol | 0.725 | kg CO₂e/kg |
| Sodium Hydroxide | 0.915 | kg CO₂e/kg |
| Ferric Chloride | 0.382 | kg CO₂e/kg |
| Polymer | 2.15 | kg CO₂e/kg |
These factors are used in Scope 3 emissions calculations.
5.4 Transportation Settings
For Scope 3 biosolids transport:
| Parameter | Default | Unit |
|---|---|---|
| Truck Capacity | 20 | tonnes |
| Truck Emission Factor | 0.104 | kg CO₂e/km |
| Average Haul Distance | 50 | km |
Step 6: Collaboration and Sharing
Configure project sharing and collaboration settings.
6.1 Access Collaboration Settings
In Settings, navigate to the "Collaboration" tab.
6.2 Default Project Permissions
Set default permissions for new projects:
| Permission Level | View | Edit | Simulate | Share | Delete |
|---|---|---|---|---|---|
| Owner (You) | ✓ | ✓ | ✓ | ✓ | ✓ |
| Team Members | ✓ | ✓ | ✓ | ☐ | ☐ |
| Read-Only Users | ✓ | ☐ | ☑ | ☐ | ☐ |
| Public Link | ✓ | ☐ | ☐ | ☐ | ☐ |
Warning: Enabling "Public Link" allows anyone with the link to view projects. Use with caution for sensitive data.
6.3 Team Management
Add team members to your organization:
- Click "Invite Team Members"
- Enter email addresses (comma-separated)
- Select default role:
- Admin: Full permissions
- Engineer: Create and edit projects
- Viewer: Read-only access
- Click "Send Invitations"
Invited users will receive an email with instructions to join.
Screenshot placeholder: Team management interface showing list of team members with role dropdowns and "Invite" button.
6.4 Inviting a colleague — what they see
The invitation email links to a page at /invitations/<token>. Your colleague does not need an ErgoPlanner account first; the link is the account.
If they are new to ErgoPlanner:
- They open the link. The page shows your company name, who invited them, the address the invitation was sent to and the role they will get.
- They fill in first name, last name and a password, and tick the terms box. The password must be at least 10 characters and contain an upper-case letter, a lower-case letter, a number and one of
@ $ ! % * ? & #— the same rule as signing up directly. - They click "Create Account". The account is created under the invited address, they join your company with the role you chose, and they land on the dashboard already signed in. No separate sign-in step, no email verification — following the link is the verification.
If they already have an ErgoPlanner account: they sign in first, reopen the link, and click "Join <your company>". Their existing account gains the new membership. The account they sign in with must use the address the invitation was sent to.
Things worth knowing:
- An invitation is valid for 7 days and can be used once. After that the page says "Invitation Expired" and shows who to contact.
- You can resend (which issues a fresh token and resets the 7 days) or cancel a pending invitation from the same Team screen.
- If the address already has an account, the registration form tells them so and points them at sign-in rather than creating a duplicate.
- An invitation joins exactly one company. If a colleague has invitations from two companies, accepting one leaves the other pending.
6.4.1 If email is not configured (or delivery fails)
Sending the invitation email depends on the server having SMTP (or SendGrid) credentials configured — on some deployments (a fresh preview, for example) it does not yet. Rather than answer as if the email had gone out, the Team screen tells you what actually happened right after you click Send Invitation:
- Sent — a plain confirmation. The colleague will get the email described above.
- Email is not configured or The email could not be sent — a dialog explaining why, with the invitation's accept link shown in a read-only box and a Copy button next to it. Nothing about the invitation is different in this case: it is still created, still valid for 7 days, and still joins the role you chose. The only thing that did not happen is the email.
When you see either of the second two, copy the link and send it to your colleague yourself — by chat, by a different email account, however you'd reach them normally. Opening the link does exactly what the emailed link does (§6.4 above): a brand-new colleague registers on the spot, an existing one signs in and joins.
The pending invitations list also has a Copy invitation link action (the copy icon next to Resend and Cancel) for getting the link again later, without needing to resend the email. Note that both this action and Resend issue a fresh link — the earlier one stops working once you resend, so use whichever one you actually send to your colleague.
6.5 Project Visibility
Set organization-wide project visibility:
- Private: Only you can see projects by default
- Organization: All org members can view (default)
- Public: Projects visible to anyone
Tip: You can override this setting per-project in project properties.
Step 7: API and Integration
For advanced users: Configure API access for custom integrations.
7.1 Generate API Key
- Navigate to "API" tab in Settings
- Click "Generate New API Key"
- Enter a name for the key: e.g., "Python Integration"
- Select permissions:
- ☑ Read Projects
- ☑ Create Projects
- ☑ Run Simulations
- ☐ Delete Projects
- Click "Generate"
Your API Key: epk_live_a1b2c3d4e5f6g7h8i9j0k1l2m3n4o5p6
Warning: Copy this key immediately! For security, it won't be shown again.
Screenshot placeholder: API key generation dialog showing permissions checkboxes and generated key with "Copy" button.
7.2 API Key Management
Manage your API keys:
| Key Name | Created | Last Used | Permissions | Actions |
|---|---|---|---|---|
| Python Integration | 2025-12-15 | 2025-12-28 | Read, Create, Simulate | Revoke |
| Excel Plugin | 2025-11-20 | 2025-12-20 | Read | Revoke |
Click "Revoke" to immediately disable a key.
Tip: Use separate API keys for different integrations so you can revoke them individually if needed.
7.3 API Documentation
Access API documentation:
- Click "API Reference" in Settings
- Or navigate directly to:
https://your-ergoplanner-instance.com/api/docs
The API uses REST with JSON and supports:
- Project CRUD operations
- Simulation execution
- Results retrieval
- Data import/export
See API-Reference for complete documentation.
Step 8: Save and Apply Settings
8.1 Save Changes
After configuring all settings:
- Review your changes in each tab
- Click "Save All Settings" at the bottom
- You'll see a confirmation: "Settings saved successfully"
Warning: Clicking "Cancel" will discard all unsaved changes across all tabs.
8.2 Settings Take Effect
Most settings apply immediately:
- ✓ Unit system changes
- ✓ Display preferences
- ✓ Default values for new projects
Some settings require page reload:
- Language changes
- Theme changes (if not set to Auto)
8.3 Export Settings
To backup or share settings:
- Click "Export Settings" in the top-right of Settings page
- A JSON file downloads:
ergoplanner_settings_2025-12-29.json - Save this file for backup or to import on another account
8.4 Import Settings
To restore or import settings:
- Click "Import Settings"
- Select a previously exported settings JSON file
- Review the preview of what will be imported
- Click "Apply Imported Settings"
Tip: Use this to quickly configure new accounts or restore after system reinstall.
Screenshot placeholder: Settings page bottom showing "Export Settings" and "Import Settings" buttons alongside "Save All Settings".
Step 9: Profile Management
Manage your personal profile information.
9.1 Update Profile Information
In Settings → "Profile" tab:
| Field | Current | Update |
|---|---|---|
| Full Name | John Smith | ✎ Edit |
| john.smith@watercompany.com | ✎ Change | |
| Job Title | Process Engineer | ✎ Edit |
| Phone | +1 (217) 555-0123 | ✎ Edit |
| Bio | (Optional) Brief description | ✎ Add |
Click ✎ Edit icon to modify any field.
9.2 Change Password
To update your password:
- Click "Change Password"
- Enter current password
- Enter new password (min 8 characters)
- Confirm new password
- Click "Update Password"
Tip: Use a strong password with mixed case, numbers, and symbols.
9.3 Profile Picture
Upload a profile picture:
- Click on the placeholder avatar
- Select image file (JPG or PNG, max 5MB)
- Crop to square if needed
- Click "Upload"
Your picture appears:
- Next to your name in the header
- On shared projects
- In collaboration invitations
9.4 Two-Factor Authentication (2FA)
Enable 2FA for enhanced security:
- Navigate to "Security" tab
- Click "Enable Two-Factor Authentication"
- Scan QR code with authenticator app (Google Authenticator, Authy, etc.)
- Enter 6-digit code from app
- Save recovery codes in a secure location
- Click "Enable 2FA"
Warning: Keep recovery codes safe! You'll need them if you lose access to your authenticator app.
Screenshot placeholder: 2FA setup showing QR code and recovery codes with checkboxes to confirm codes saved.
Step 10: Advanced Settings
For power users and administrators.
10.1 Performance Settings
Optimize ErgoPlanner for your system:
| Setting | Default | Range | Impact |
|---|---|---|---|
| Canvas Rendering Quality | High | Low/Med/High | GPU usage |
| Max Undo History | 50 | 10-200 | RAM usage |
| Auto-save Interval | 5 min | 1-30 min | Disk I/O |
| Simulation Workers | 4 | 1-16 | CPU usage |
| Results Cache Size | 100 MB | 50-500 MB | RAM usage |
Tip: Lower quality settings if you experience lag on older hardware.
10.2 Experimental Features
Enable beta features (use with caution):
- ☐ Advanced CFD visualization
- ☐ Machine learning parameter optimization
- ☐ Real-time plant data integration
- ☐ Multi-user collaborative editing
Warning: Experimental features may be unstable. Not recommended for production use.
10.3 Data Management
Configure data retention and privacy:
| Setting | Value | Description |
|---|---|---|
| Auto-delete old simulations | 90 days | Simulations older than this are archived |
| Project backup frequency | Daily | Automatic backup schedule |
| Analytics Tracking | Enabled | Anonymous usage data for product improvement |
| Crash Reporting | Enabled | Send error reports to developers |
Privacy options:
- ☑ Share anonymous usage statistics
- ☐ Share project metadata for research
- ☑ Receive product update emails
- ☐ Share email with partners
Summary
You've configured:
- ✓ Account and company information
- ✓ Regional settings and units
- ✓ Default preferences for projects
- ✓ Carbon footprint settings
- ✓ Collaboration and sharing options
- ✓ API access (optional)
- ✓ Profile and security settings
Your ErgoPlanner instance is now personalized and ready for efficient workflow!
Common Questions
Can I change settings later?
Yes! All settings can be modified at any time from the Settings page.
Do settings apply to existing projects?
Most settings only affect new projects. Existing projects retain their original settings unless manually updated.
Can I have different settings for different projects?
Yes, project-level settings override account defaults. Configure per-project in Project Properties.
What happens if I change the unit system?
New projects use the new units. Existing projects remain in their original units. You can convert projects via Project → Convert Units.
How do I reset to default settings?
Click "Reset to Defaults" at the bottom of any settings tab. This only resets that specific tab.
Next Steps
Now that your account is configured:
- First-Simulation - Run your first simulation with your custom settings
- Creating-Projects - Create a new project using your defaults
- Carbon-Footprint - Use your carbon settings for emissions analysis
- Interface-Overview - Explore interface with your display preferences
Related Topics:
- Keyboard-Shortcuts - Customize keyboard shortcuts
- Exporting-Data - Export with company branding
- API-Reference - API integration documentation
Last updated: December 2025Tutorial difficulty: BeginnerEstimated completion time: 10 minutes